Canon AE-1 Program⁚ A Comprehensive Guide
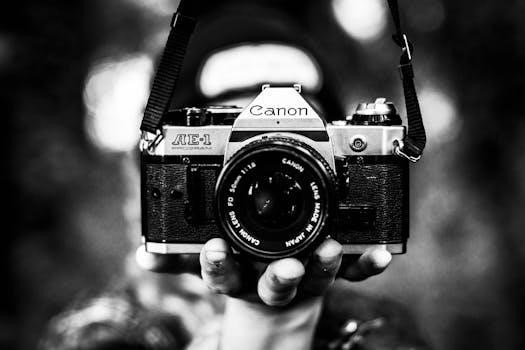
The Canon AE-1 Program, released in 1981, built upon the success of the AE-1, adding program mode for simplified shooting. This guide provides a detailed look at its features, operation, and maintenance. It is designed for beginners to advanced enthusiasts!
The Canon AE-1 Program, a 35mm single-lens reflex (SLR) camera, emerged in April 1981 as the successor to the popular Canon AE-1. Its major advancement was the inclusion of Program AE mode, initially seen in the Canon A-1. This new mode provided fully automatic exposure control, catering to both beginners and experienced photographers. It was designed for users who wanted high-quality images without complicated controls.
The AE-1 Program aimed to offer simplicity and convenience. With program mode, users could simply point, focus, and shoot, allowing the camera to select the optimal aperture and shutter speed. This made it an ideal choice for capturing everyday moments with ease. The camera retains full manual and shutter-priority modes.
Canon designed it specifically with two groups in mind⁚ Photography Enthusiasts⁚ Beginners and hobbyists sought a high-quality camera that wouldn’t overwhelm them with complicated controls. The ease-of-use, Program mode, and clear feedback in the viewfinder made the AE-1 Program the ideal camera.
Key Features and Improvements Over the AE-1
The Canon AE-1 Program introduced several key improvements over its predecessor, the AE-1. The most notable was the addition of Program AE mode, a fully automatic exposure mode. This allowed the camera to automatically select both the aperture and shutter speed, simplifying the shooting process for beginners. The original AE-1 only offered shutter-priority auto mode and full manual.
Another significant enhancement was the electronic light meter readout in the viewfinder. This provided clear and accurate exposure information, making it easier to achieve well-exposed photos. The AE-1 Program also included minor improvements, offering a more refined user experience. It also included a more robust body design. This made it a more durable camera, and it was less likely to break.
The AE-1 Program retained the AE-1’s shutter-priority mode and full manual control, providing flexibility for more experienced photographers. These improvements made the AE-1 Program a versatile and user-friendly camera. It was well-suited for both novice and experienced photographers.
Understanding Program Mode⁚ How it Works
Program mode on the Canon AE-1 Program offers a simplified shooting experience, automatically selecting both the shutter speed and aperture for optimal exposure. To activate it, set the shutter speed dial to “Program” and the lens aperture ring to “A”. The camera then analyzes the scene’s light and chooses appropriate settings.
The camera leans slightly towards higher shutter speeds. This helps to reduce motion blur in everyday shooting conditions. This makes it good for people who don’t have a lot of experience. The photographer retains control over focusing and composition. This allows them to concentrate on the creative aspects of photography.
Program mode excels in evenly lit situations. It can be fooled by backlit scenes, needing manual adjustments for best results. It’s an excellent starting point for beginners to learn exposure basics. It helps them transition to more advanced modes. Understanding its limitations allows for more informed photographic decisions and better pictures.
Using Manual Mode⁚ Setting Shutter Speed and Aperture
Manual mode grants complete control over exposure by allowing you to independently set both the shutter speed and aperture. To engage manual mode on the Canon AE-1 Program, simply move the shutter speed dial away from the “Program” setting and choose your desired shutter speed, indicated in seconds or fractions of a second.
Next, adjust the aperture ring on the lens to your chosen f-stop number, controlling the lens’s diaphragm opening and depth of field. Refer to the camera’s light meter, visible in the viewfinder, to gauge the correct exposure. The meter indicates overexposure or underexposure, guiding your adjustments.

Balance shutter speed and aperture to achieve a centered meter reading for optimal exposure. Manual mode demands understanding the interplay between these settings. Experimentation is key to mastering creative control. It allows for capturing specific effects, such as motion blur with slower shutter speeds or shallow depth of field with wider apertures.
FD Lens Compatibility and Usage
The Canon AE-1 Program utilizes the Canon FD lens mount, a breech-lock system offering a wide range of compatible lenses. FD lenses are easily identified by their chrome locking ring at the base, which secures the lens to the camera body. To mount an FD lens, align the red dot on the lens with the red dot on the camera body. Then, insert the lens and twist the chrome locking ring until it clicks into place, ensuring a firm connection.
To remove the lens, press the lens release button located near the lens mount and twist the chrome locking ring in the opposite direction while gently pulling the lens away from the body. The FD system provides access to various focal lengths, from wide-angle to telephoto, catering to diverse photographic needs.
When using FD lenses with the AE-1 Program, remember that the aperture is controlled manually using the aperture ring on the lens itself, even in program mode. Familiarize yourself with the depth-of-field scale on the lens barrel to understand the zone of sharpness at different aperture settings.
Exposure Metering in Manual Mode

When shooting in manual mode on the Canon AE-1 Program, understanding the exposure metering system is crucial for achieving well-exposed images. The camera employs a center-weighted average metering system, which evaluates the light intensity across the frame but gives more importance to the center area. To activate the meter, gently press the shutter release button halfway.
Inside the viewfinder, you’ll see a needle indicating the recommended aperture setting for the current lighting conditions, based on your selected shutter speed; The goal is to align this needle with the “0” mark in the viewfinder. If the needle points above the “0,” it indicates overexposure; reduce the aperture (increase the f-number) or increase the shutter speed. Conversely, if the needle points below “0,” it indicates underexposure; open the aperture (decrease the f-number) or decrease the shutter speed.
Experimentation is key in manual mode. Use the meter as a starting point, but don’t hesitate to deviate based on your artistic vision. Remember that the meter can be fooled by scenes with high contrast or strong backlighting. Understanding these limitations and learning to compensate are essential skills for mastering manual exposure.
Common Issues and Troubleshooting
Like any vintage camera, the Canon AE-1 Program can experience certain common issues. One frequent problem is the “Canon squeal,” a high-pitched noise caused by a deteriorating lubricant in the mirror mechanism. While not affecting image quality initially, it indicates the need for servicing. Another potential issue is a faulty light meter, leading to inaccurate exposure readings. This can be due to a dead or weak battery or a malfunctioning sensor. Ensure you’re using a fresh battery of the correct type.

Sticky shutter blades can also occur, resulting in inconsistent shutter speeds. This is often caused by old lubricant and requires professional cleaning. Additionally, check the battery compartment for corrosion, which can disrupt the camera’s electrical circuits. Clean any corrosion with a cotton swab and vinegar.
If your images are consistently over- or underexposed, even after verifying the light meter and settings, the issue might lie with the shutter or aperture mechanisms. These components could be sticking or malfunctioning, preventing accurate exposure. Regular use and proper storage can help prevent some of these issues, but a CLA (Clean, Lube, and Adjust) service by a qualified technician is recommended for optimal performance.
Tips for Beginners⁚ Getting Started with the AE-1 Program
Embarking on your film photography journey with the Canon AE-1 Program can be exciting! Start by familiarizing yourself with the camera’s basic controls. The shutter speed dial, located on the top right, controls the duration of exposure. The aperture ring on the lens adjusts the lens opening, controlling both light and depth of field. Begin with Program mode (“Program” on the shutter dial, “A” on the lens) to let the camera handle exposure automatically.
Practice focusing by rotating the focus ring on the lens until your subject appears sharp in the viewfinder. Pay attention to the light meter needle in the viewfinder; it indicates whether your image will be properly exposed in manual mode. When using Program mode, the camera selects the exposure.
Load film carefully, ensuring it’s properly engaged with the take-up spool. After taking a shot, advance the film lever to prepare for the next frame. Experiment with different settings as you become more comfortable. Don’t be afraid to make mistakes – they are part of the learning process! Keep a notebook to record your settings and observations, helping you understand how different choices affect your images. Most importantly, have fun and enjoy the creative process.
The AE-1 Program in the Second-Hand Market⁚ What to Look For
Venturing into the second-hand market for a Canon AE-1 Program can be a rewarding experience, but it requires careful consideration. Begin by visually inspecting the camera body for any signs of significant damage, such as dents or cracks. Check the battery compartment for corrosion, as this can affect the camera’s functionality. Ensure the film door opens and closes smoothly and that the light seals are intact to prevent light leaks.
Test the shutter at various speeds to confirm its accuracy. Listen for any unusual sounds or hesitations. Examine the lens mount for damage and ensure the lens attaches securely. Inspect the lens itself for scratches, fungus, or haze, which can impact image quality. If possible, test the camera with film to verify the light meter’s accuracy and the overall functionality of the camera.
Ask the seller about the camera’s history and any previous repairs. A reputable seller should be transparent about the camera’s condition. Compare prices from different sources to get a sense of the market value. Be prepared to negotiate, but prioritize condition over price. Remember to factor in the cost of potential repairs or maintenance when making your decision. A well-maintained AE-1 Program can provide years of enjoyment.
Example Photos and Settings
To illustrate the Canon AE-1 Program’s capabilities, let’s examine some example photos and the settings used to capture them. For a bright, sunny outdoor scene featuring a landscape, a typical setting might involve using an FD 50mm lens at f/8 or f/11 for optimal sharpness and depth of field. The shutter speed, when in program mode, would be automatically selected by the camera, likely around 1/250th or 1/500th of a second, depending on the specific lighting conditions.
In a portrait scenario under moderate indoor lighting, a wider aperture like f/2.8 or f/4 with the FD 50mm lens could be used to create a shallow depth of field, blurring the background and emphasizing the subject. The program mode would likely select a slower shutter speed, possibly 1/60th or 1/125th of a second. Ensure adequate lighting or consider using a flash to avoid motion blur.

For a nighttime street scene, a faster lens like the FD 50mm f/1.4 would be beneficial. Using a wide aperture like f/1.4 or f/2 and setting the ISO to 400 (if possible using higher ISO film) the program mode might select a shutter speed of 1/30th or 1/60th of a second. Consider using a tripod to prevent camera shake in low-light situations.